Thinking about setting up an online payment form for your business? You are likely deciding between third-party solutions and developing your own in-house solution. Each option has its own set of pros, cons, and costs to consider. Here’s what you need to know about setting up an online payment form, and then optimizing the form to make it as easy as possible for your customers to use.
What is an online payment form?
Every day more and more business processes are moving online. An online payment form allows your customers to easily make purchases or pay invoices online, on any device, at any time. These forms are typically more limited than a full-scale shopping cart on a website, but are robust enough for one-time or ongoing service payments from customers.
A payment form is the most convenient method of payment today, increasing the likelihood that you’ll get paid. Beyond this, it’s also a great way to collect important customer information at the time of payment, such as email addresses and telephone numbers. A great payment form even allows you to safely store credit card information on file for customers who make recurring payments.
Payment forms are beneficial for any business, regardless of size.
If you own a small business selling handmade products on commission, but don’t have a storefront, a payment form will be an essential element for your website. For larger organizations, it’s critical. You’ll need a solid website payment system that is user-friendly, fast, and convenient.
Before you set up an online payment form, consider the pros and cons of in-house development versus third-party online payment form solutions.
Advantages of Third-Party Online Payment Form Software
If you sell products online, your customers expect an easy-to-use online payment form. Once you’ve determined that you need one, using a third party software provider for your online payment forms offers the following advantages:
- Simplicity: No major software development is required to implement online payment forms from an all-in-one solution into your business.
- Security: By working with a software provider, you can lean on them to ensure appropriate security requirements are met.
- Guidance: Third-party software that integrates with a merchant account can assist you in the underwriting process and automatically integrate your merchant account with your online payment solution.
- Easy website integration: Most solutions can set you up with payment forms that are linkable from emails and through your website so you can get paid online easily.
- Low upfront and ongoing costs: Since there are no major development costs to start using an outsourced solution, it’s fairly cheap to get started. While you may have to pay monthly service fees for the outsourced platform, you won’t have to pay your own secure hosting costs.
How are you accepting payments?
Learn all the ways to accept online payments
Click here to access the FREE [Cheat-Sheet]
How To Set Up An Online Payment Form Using Third-Party Software
If you’ve decided on a third-party solution, these are the steps to take to ensure your payment form is secure and cost-effective.
1. Research your options
There are a lot of payment acceptance solutions and software available, so it’s wise to do some research. Things you should keep in mind when weighing your options include:
- Setup Fees
- Funding practices (direct to your bank account versus retrieving from the provider)
- Monthly service fees
- Additional per-transaction fees
Also, make sure to check that your processing provider will integrate with a payment form (not all do).
2. Set up your merchant account
Depending on which option you choose in step one, you may or may not have to go through merchant account underwriting.
If you decide you want a merchant account because of faster funding, lower fees, or other benefits, the software provider you choose will help you through the underwriting process.
3. Build the payment form
Using your new software, you can now start customizing your payment forms.
Determine the products, services, and payment types you’d like to offer, then upload your logo and activate the form.
4. Integrate into your practice
Transitioning to online payment forms will save you a lot of hassle in the long run.
Initially, however, you’ll have to take the necessary steps of notifying your customers and getting used to the system yourself. You’ll also need to decide if you want to link the form from your website or in emails.
Advantages of an In-House Online Payment Form
Building your online payment forms in-house has advantages that you should consider as well. These include:
- Control: The more control you have over development, the more you can tailor the solution to your business. When building your own online payment form solution, you can customize functionality directly to your needs.
- Feel: While you are able to customize your certain third-party solutions, you can design your in-house forms any way you like, ensuring they match the feel and flow of the rest of your website.
- Flexibility: If you eventually want to expand your online payment functionality into a shopping cart, you will already have many of the pieces in place from implementing the online payment forms. Again, because it’s your code, you can revise and update as needed.
How to Set Up an In-House Online Payment Form
Like third-party solutions, there are a few things to be aware of when setting up your own payment forms.
1. If you’re not an expert, get one
When setting up a secure payment form, it’s critical that you get the security, coding, and connections right.
2. Set up a hosting platform
Secure hosting protects important data and financial information from being stolen. Apply for an SSL (Secure Socket Layer) certificate to acquire the data encryption technology.
3. Register your site
Once you have an SSL certificate, you’ll need to register the site that you’ll be using to set up the online payment form with a digital authentication service.
This service certifies that the site is the correct one and that you’re encrypting sensitive information.
4. Build the payment form
Next, you’ll need to either buy software or use a developer to integrate payment functionality on your site.
Online payment forms may have less moving parts than full shopping carts, but the page still needs a “click to pay” link that takes customers to your secure server to input payment information.
5. Find a processing solution with an applicable API
Merchant accounts give you the ability to process payments. If you want ACH payments in addition to credit cards, you may have to find separate processing partners.
6. Integrate the processing platform with your payment form
Once your merchant account is acquired, you’ll need to get the API keys to link your secure form into their back-end processing.
7. Test and Launch
Test the form before publishing it for your customers to use. To test, try combinations of payments with products and make sure your form is fully functioning.
When everything is running smoothly and you’ve tested thoroughly, you can launch your form and make it public.
8. Make support easy to find
Provide a support phone number, chat option, or email address so users can quickly contact you if they need help. If you have a robust online support center, provide a link to it.
Online Payment Form Tips
Now that you have an online payment form set up, make it easy for your customers to use. The design can have a significant impact on your customers’ completion rates, affecting the volume of online payments you’re receiving. It can also greatly reduce the number of support calls or emails. Here’s how to create a better payment form.
1. Make it easy to read
While it may sound obvious, this is very important.
Make sure all of your text is spelled correctly and coordinates with your form fields. Use a simple and standard font style, size, and color.
Sans-serif fonts in standard size and color are easiest to read.
Serif fonts in bright colors can cause eye strain.
2. Create a natural flow
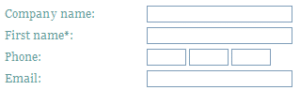
The ideal alignment and field layout depends on the type of information being requested. Top aligned fields like those pictured below, typically have the fastest completion times. If you only have a few fields and you want customers to be able to breeze through them, this layout is for you.

Top-aligned field labels
Right-aligned fields can also offer quick completion times and a shorter page. They can create a vertical “seam” down the page, making it visually easier for the user to complete the form. However, they can create a limitation for field length and cause awkward line breaks for longer field labels.

Right-aligned field labels
Finally, there are left-aligned labels. Although these typically have the slowest completion time, they have the benefit of a shorter form, as well as the flexibility of longer labels. A left-aligned field layout can work best for longer forms that use a two-column layout.
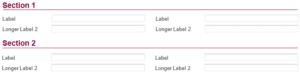
Left-aligned field labels with a two-column layout
3. Provide a clear destination
A brightly colored or boldly designed “submit” or “continue” button is important.
When possible, placing it above the fold (the visible part of a screen without scrolling) can help increase your conversion rate and gives your customers a visual end point to the form.

Bright and clear page destination
4. Keep it simple
Less is more. Use multiple pages or clear section headers to break longer forms into digestible chunks.
A progress indicator can also help users know where they are in the process. If possible, opt for shorter forms that deter user frustration and increase follow-through.
5. Complete as much information as you can
If you have the ability to securely store customer account information, and you know customers will be repeat users, have them create accounts upon making their first online payment.
This allows for contact information, billing address, and payment details to be auto-populated for their next payment, greatly increasing completion rates. Customers will be able to simply log in, review their information, and click “Submit,” with little or no data entry.
6. Use a security logo or seal
Include a logo or security seal of the company providing your data security protection.
If you’re using a third party service, make sure they use a seal that shows who is processing the payment.
Example security seal
7. Use in-screen help tools
Tooltips can give your customers the information they need without having to exit your form page. They are generally displayed as a question mark that a user can hover over or click to get more information about a field or section.
Field tooltip
Better, field validation can ensure an improperly completed field alerts the user to the error without leaving the page.

Form field validation
8. Start with an online payment form template example
If you’re looking to streamline and automate your online payments, PaySimple can help. Whether you’re searching for simple registration and payment forms or recurring payment forms with options, our team can get you the tools you need.
Here is a glance at the approach taken by PaySimple.

Before You Decide
Before you make your decision between third-party provider or in-house development, and how you want to design your form, consider a few questions.
First, take inventory of your resources. If you’re a small business without in-house “experts” or a development team, it may be wise to go with a proven third party solution. That way, you don’t have to hire extra people along the way. Conversely, if you have the technological resources, it may be wise to solve the problem in-house to ensure flexibility as your processes or business evolve.
Second, examine the cost of your options and what functionality you want in your form. Upfront setup fees, long-term hosting, and security and processing costs can be significantly different between the two options. Adding functionality to the form itself may require more development time and technical know-how.
No matter what you decide, online payment forms give your customers the power to pay online, which improves your efficiency, cash flow, and customer satisfaction. This can mean big improvements and growth for your business!
Start a 14 day Free Trial and streamline your business with PaySimple:
Start My Free Trial